Quotes & Estimates
A short, practical guide to building quotes your customers can accept with one tap — and turning them into invoices the moment they say yes.
The flow, end-to-end
Here's what the whole thing looks like before we dive into each step:
You build the quote
Pull line items from your products catalog, add a discount or tax rate if you need one, and pick how long it's good for.
You hit Send
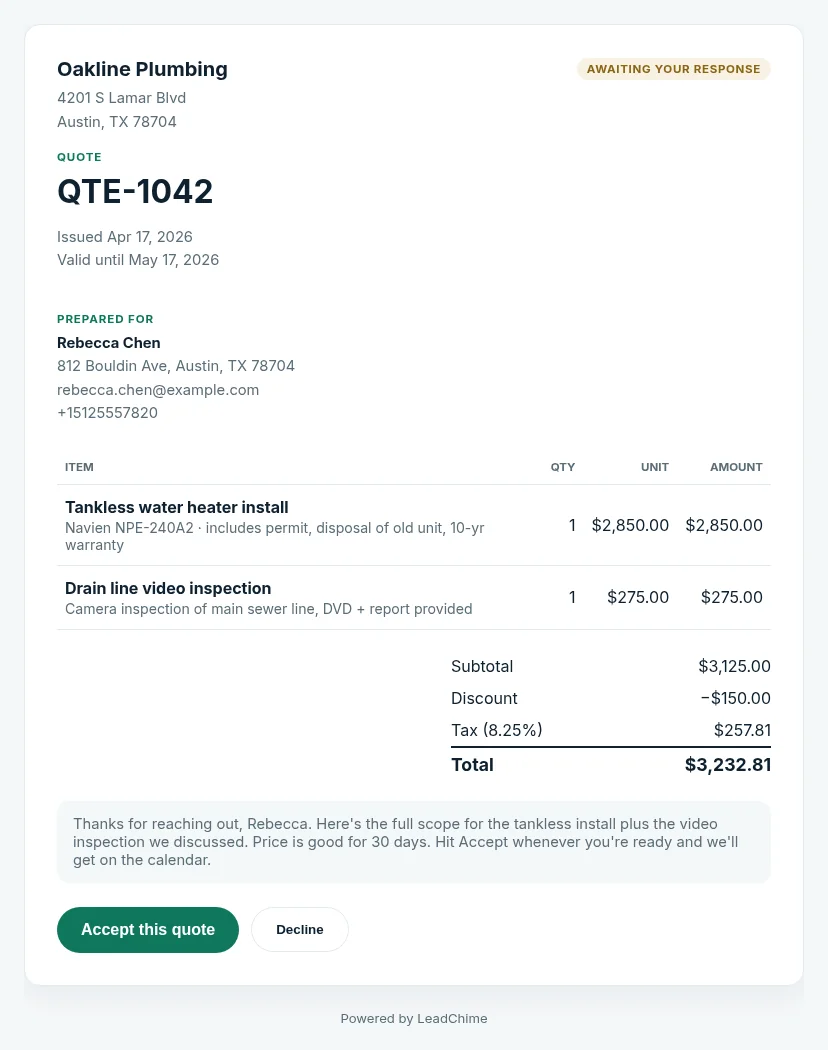
We text and email the customer a secure link. No app, no login, no PDF to print.
They tap Accept (or Decline)
Takes under a minute from their phone. You're notified the second they do.
You convert it to an invoice
One click — everything carries over. You're done with data entry.
Creating a quote
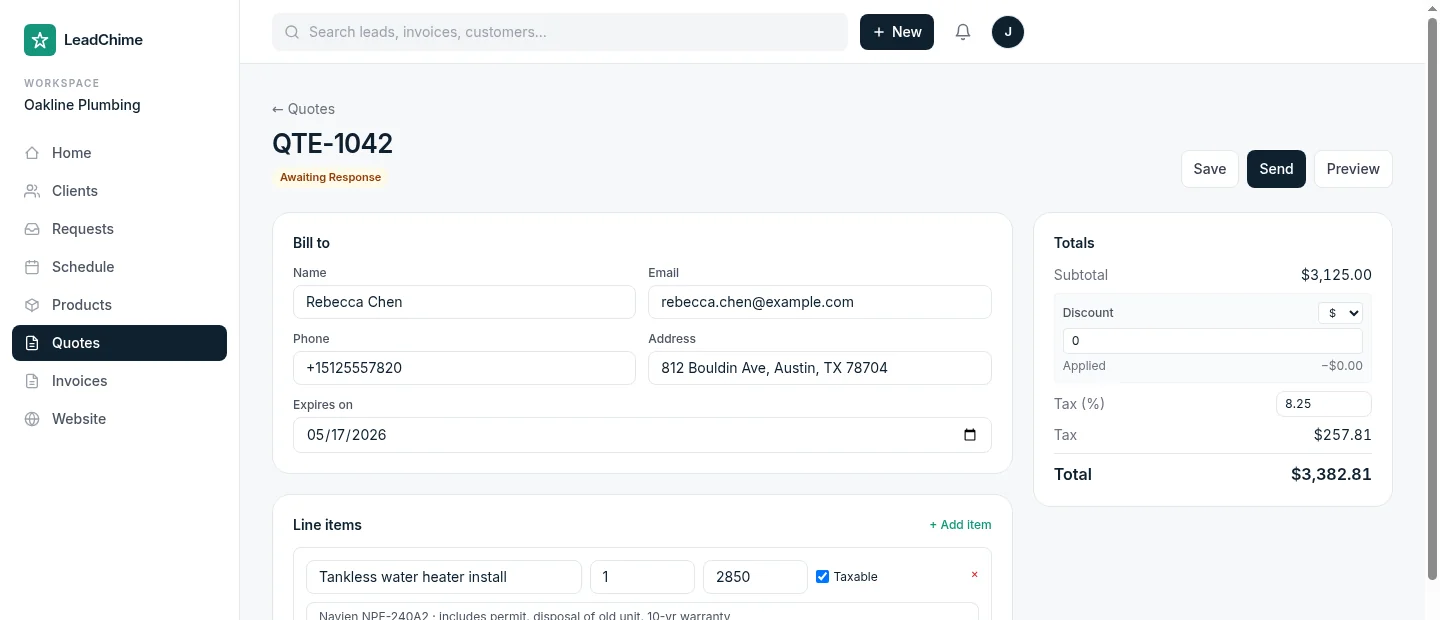
From the Quotes tab, click New quote. A blank draft is created and you're taken to the quote builder. The quote is saved automatically as you work — you can close the tab and come back to it later.
Fill in Bill to. Start typing a name and any matching existing customer will appear in the dropdown; pick one and their email, phone, and address autofill. If this is a brand-new customer, just type the fields in directly.
Set an expiration. Defaults to 30 days from today. See How expiration works below for what actually happens at the deadline.
Adding line items
Click + Add item. In the item name field, start typing — any product or service in your products catalog that matches the text will appear in a dropdown. Pick one and the name, unit price, and taxable flag fill in automatically.
Tip: build your catalog first. Every minute you spend adding products is 10 seconds saved on every future quote. Give each one a description, price, and a clear "taxable" setting.
You can also type items directly without picking from the catalog — but they won't save for reuse.
Discounts
In the Totals panel, pick $ for a flat dollar amount (e.g. $50 off) or % for a percentage of the subtotal (e.g. 10%). The discount shows on the customer's quote as a reduction.
Tax
Enter your tax rate as a percentage. Tax only applies to line items marked Taxable, so you can mix taxable services with non-taxable materials on the same quote.
Sending the quote
When you hit Send, LeadChime does four things at once:
- Texts the customer a short message with a secure link
- Emails them the same link (if we have their email)
- Marks the quote as Awaiting response
- Schedules automatic follow-ups at 2, 7, and 14 days (unless they respond first)
The link is tied to a unique token — anyone with the link can view the quote, so don't share it with anyone who shouldn't see the price. But they can't accept or decline on your behalf without a code; they see your branded quote page with Accept and Decline buttons.
Heads up: if your workspace doesn't have Twilio credentials configured, the SMS won't go out — but the email still will. Contact us to get SMS set up if you haven't already.
How expiration works
Every quote has an expiration date — defaults to 30 days from when you create it. The customer sees that date at the top of the quote ("Valid until May 17, 2026").
After the expiration date, the quote's status automatically flips to Expired. The customer can no longer accept the link until you either extend the expiration (by editing the quote) or re-send.
Why do this? Two reasons:
- Gentle pressure to decide. Customers are more likely to say yes when there's a deadline, even a soft one.
- Price protection. If your costs change, you're not on the hook for a quote from six months ago.
Turning a quote into an invoice
Every quote that hasn't been declined or already converted has a Convert to invoice button at the top of the quote editor. It's highlighted once the customer accepts, but you don't have to wait — if they said yes over the phone or paid on the spot, convert the quote right away. Click it and LeadChime creates a draft invoice with:
- All the same line items, quantities, and unit prices
- The same discount and tax rate
- The same customer info
- Your default invoice message (if set) or the quote's message
The original quote stays on file with a status of Converted and a link to the invoice it became. You review the draft invoice, make any tweaks, and send it.
Already started an invoice? Open it and use Start from a quote above the line items to pull the customer, discount, tax rate, and every line item from one of your open quotes.
Tip: you can convert a quote only once. If you need two invoices from one quote (e.g. 50% now, 50% later), convert once and then manually create a second invoice from the customer's record.
Change orders
Scope changes mid-job — the customer wants an upgrade, or you're crediting back something you dropped. A change order is a small, separate document that amends an accepted quote: it captures only what changed and gets its own quick re-approval, so there's a clear paper trail and no arguing about the new total later.
Start it from the quote
On an accepted (or converted) quote, click + Change order. It opens a fresh CO-#### that remembers the original quote's total and customer.
Add and remove lines
Each line is either an Add (new work, a positive amount) or a Remove / credit (a negative amount). Write a short "what's changing" note, and the totals panel shows it live: Original quote → this change → new total.
Send for approval
Hit Send for approval. The customer gets a link showing the original total, the itemized adds and credits, and the new project total — with one clear Approve button (or Decline with a reason).
Bill the new total
Once approved, use Apply to invoice to generate an invoice that combines the original lines with the approved changes — so you bill the correct new total, not the old quote.
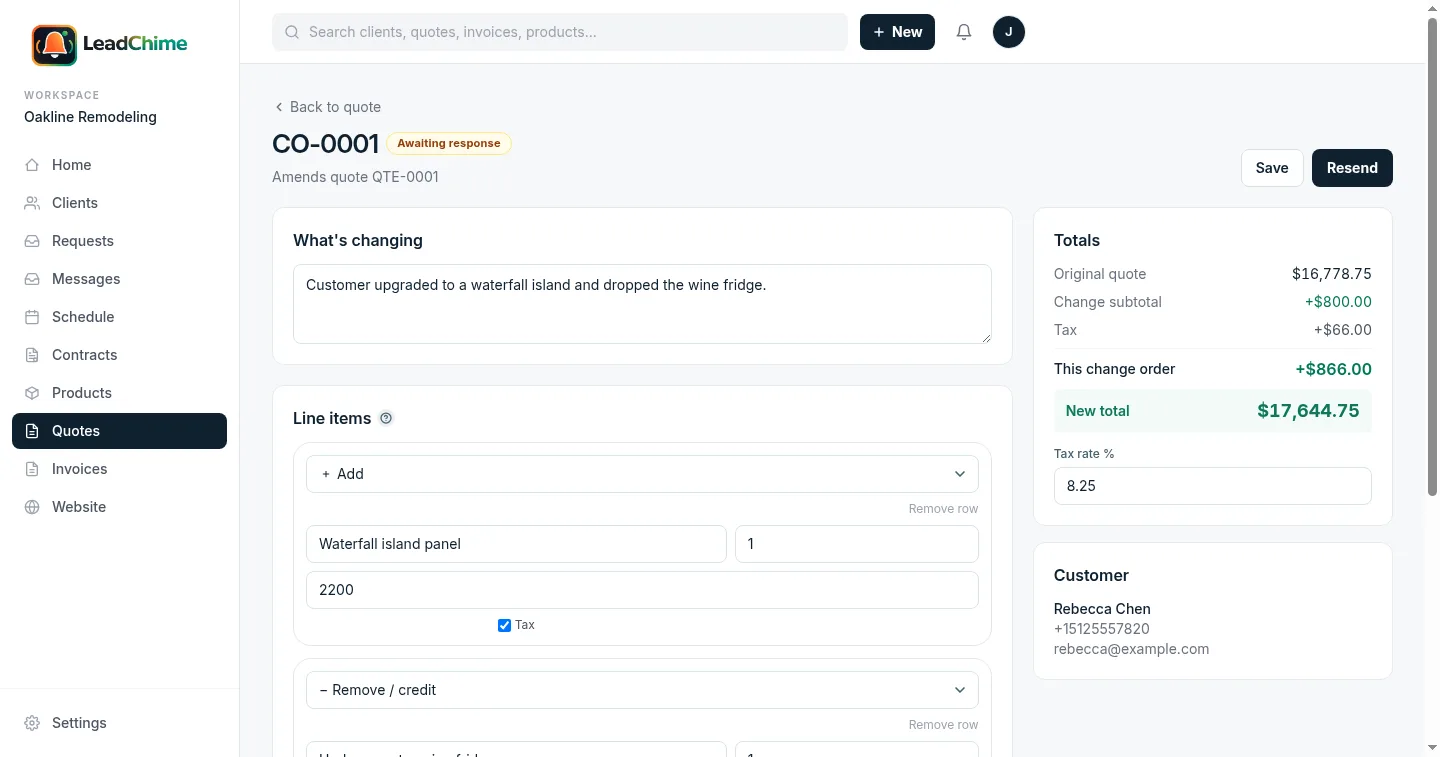
Here's what the customer sees when you send it — the original total, each add and credit, and the new project total with one Approve button:
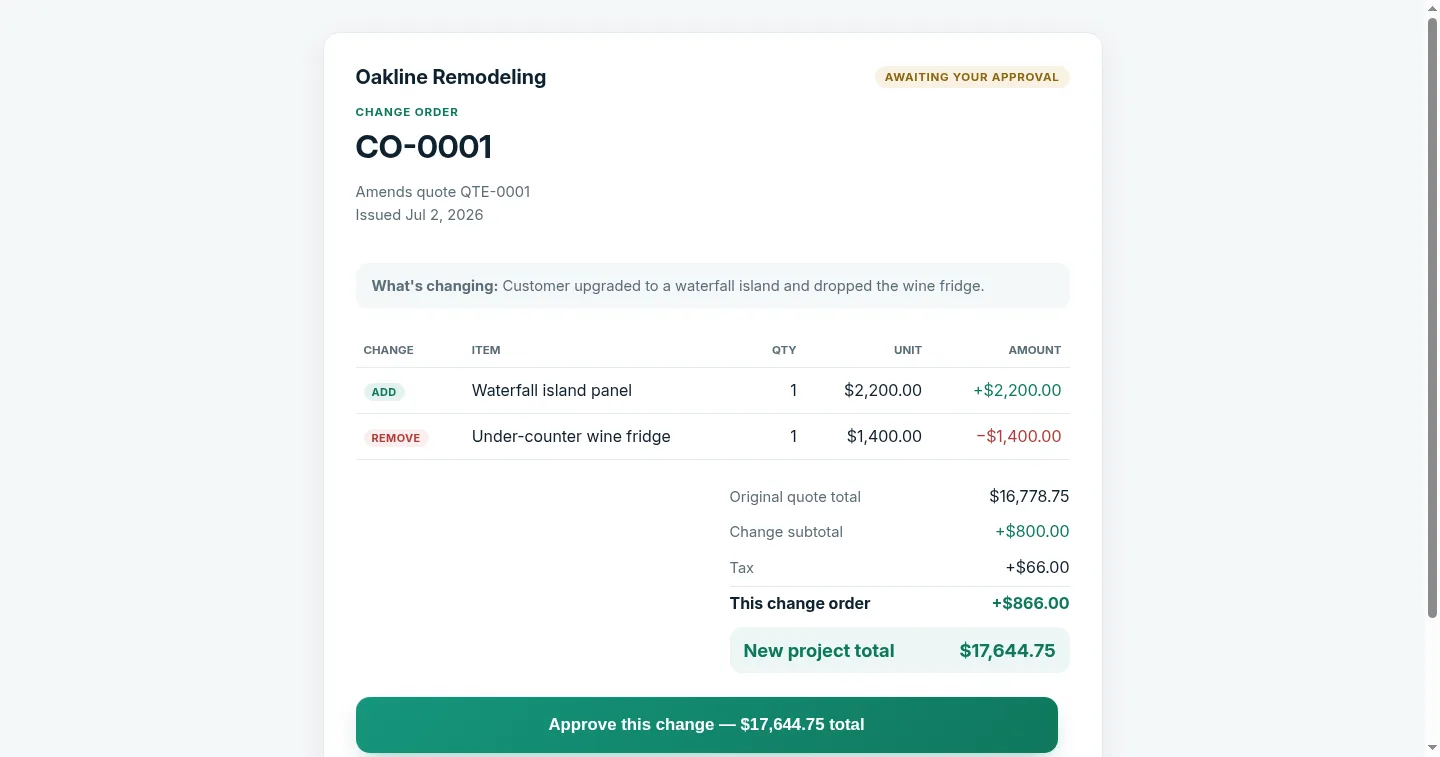
Every change order for a quote is listed on the quote itself with its status and its dollar impact (+ or −), so the full history of a job's price is always in one place.
Why a separate document? The original quote stays exactly as the customer accepted it. The change order records the delta on its own, so both of you can always see what was agreed and what changed after.
When a customer declines
If the customer hits Decline, they're asked for an optional reason ("Going with another provider on price", "Not doing the project yet", etc.). Whatever they write shows up on your copy of the quote.
Declined quotes stay on file forever — you can follow up weeks or months later. Over time, the reasons build a picture of why you're losing business, which is often more valuable than the quote itself.
Automatic follow-ups
If a customer opens a quote and doesn't respond, LeadChime sends them three short text reminders on your behalf:
- Day 2: friendly nudge ("Just checking in on the quote I sent…")
- Day 7: second touch ("Still happy to answer questions…")
- Day 14: last touch ("This one expires soon — want me to extend?")
Follow-ups stop automatically the moment the customer accepts or declines. You can also pause them on any specific quote, or edit the templates in Settings → Messages.
Tracking the pipeline
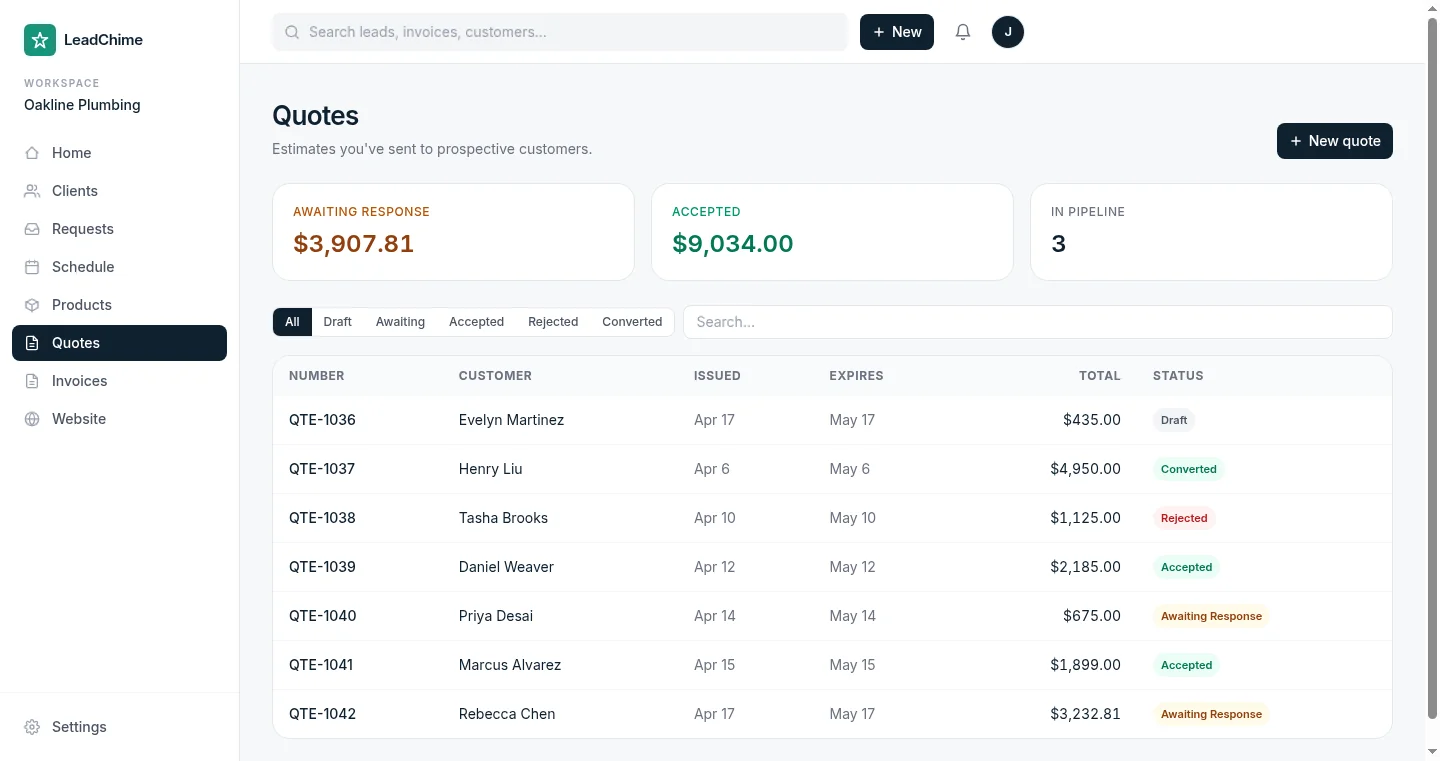
The Quotes index page shows every quote you've sent with three totals at the top:
- Awaiting response — total dollar value of quotes the customer hasn't responded to
- Accepted — total value of accepted + converted quotes
- In pipeline — count of drafts plus awaiting responses
Use the status filter tabs to see just drafts, just accepted, just rejected, etc. Search by customer name, email, or phone to find a specific quote.
Common questions
Can I edit a quote after sending it?
Yes, until the customer accepts. Once it's accepted, the quote is locked — make changes on the resulting invoice instead.
Does LeadChime generate PDFs?
Not yet. The quote link opens in the browser and is mobile-friendly — the customer doesn't need to download anything. PDF download is on the roadmap.
Can I accept deposits or partial payments on a quote?
Not yet. Today, deposits are captured on the invoice after conversion. If this is important to you, let us know — we prioritize based on demand.
Can my customer view past quotes?
Each quote link is single-purpose — opens that one quote. There's no customer portal (yet). If they need to see multiple quotes or invoices, you'd send them each link separately.
Ready to try it? Start sending branded quotes in under an hour.
Get Started